Showing posts with label tip. Show all posts

Saturday, 16 October 2010

Snaps press hack


If you own a snap press for nappies, it only comes with the dies for plastic snaps. And if you want to buy the dies for metal snaps at a later date, well, it's pretty darn exxy.
I discovered a simple solution the other day when fuming over lack of funds to purchase said dies.

I give you the snaps press hack!
So simple I'm surprised I didn't think of it before. Just take out the top die and replace with the little tool that comes in the packet of snaps. Tighten. Put the base snap holder on the lower die. A bit of padded double sided sticky tape works well to hold it in place.

And that's it. So easy.
The result is much nicer than when I bang away with a hammer too.


Happy snapping!

xCherry

www.FuriousKingston.com.au

Sunday, 10 October 2010

Sewing tip: keep your needles handy


Next time you switch needles, keep the packet somewhere handy so you remember what kind you're using. Far easier than trying to read the tiny numbers on the needle, let alone remember if it's a ball point or sharp.
Oh and a piece of fabric wrapped around the machine with a little wadding underneath makes a great pin cushion in the handiest place. Not the prettiest, I know. And you'd get hate mail if you sent it out in a pin cushion swap, but it definitely keeps pins nearby when you need them.

xCherry

www.FuriousKingston.com.au

Monday, 4 October 2010

Tip: easy fusing cutting for waistbands


For an easy way to cut out fusing for waistbands, belt loops, straps and other long straight items:
Just buy a roll of fusing and slice through at the width you need.
It makes it so much easier to iron/press onto your fabric too.
Just be sure to cut carefully so it's not on a funny angle, or you'll end up with wavy edges.
I just used a sharp knife on my breadboard. It's much cheaper than buying the small precut rolls of thin fusing too. This 1m wide x 10m long roll of standard fusing was $8 from my local store, compared to $12 for just 3m of fusing precut to a waistband width.
Such a timesaver!

xCherry

www.FuriousKingston.com.au

Wednesday, 22 September 2010

Sewing tip: turning sharp corners

Step 1:
Sew your corner nicely. For thinner fabrics a perfect corner, pivoting around the needle like the left one. Thicker fabrics need a bit more room, so pivot twice, using a stitch as the corner like the sample on the right.


Step 2:
Trim the seams down to a minimal width, and clip the corner.


Step3:
Holding the corner like this, use your fingers to fold down the seam allowance so that it folds inside out nicely, instead of crumpling up inside.


The corner should look like this after you turn it right side out.
Not very sharp, right? But a good start, since there's no excess fabric inside clogging up the corner.

Step 4:
Insert your snips (or a small pair of embroidery scissors), on the inside of the corner and push out. Not too hard, you don't want to pierce through!


Step 5:
Pinch the corner a little bit to finish off the shaping.


Done!
Beautiful corners!

As you can see below, the one on the left isn't quite shaped right, it's a bit stretched. That's because it was sewn with the corner for thin fabric, but on thick twill, which needs the thick fabric cornering. Clear as mud?


Happy sewing!

xCherry

www.FuriousKingston.com.au

Sunday, 19 September 2010

Piping- do it yourself the easy way

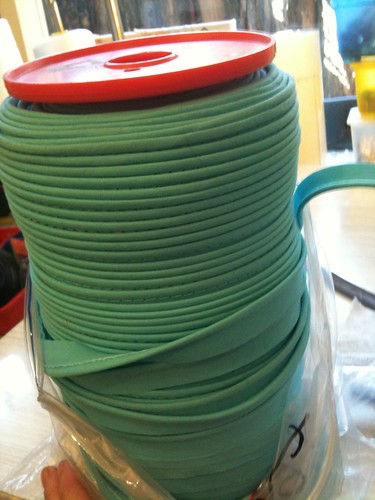
If you want to make your own piping, the easiest way is to get some existing piping and cover it. Maybe a huge roll on sale(I love Jack Stock), or some funk-eugh colour from the op shop or ripped out of an old garment. Just make sure it's colourfast, though. You don't want to cover red piping with a lovely cream satin and then have it run in the wash!

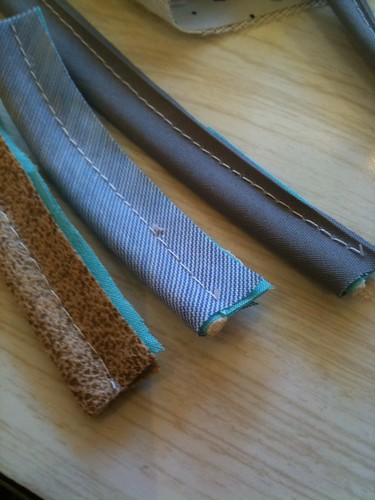
Then cut your bias strips of your new fabric, fold over the piping, keeping the fabric nice and firm around the cord, and stitch down. If you use a great big stitch, it will take no time at all, and try to sew closer to the edge rather than the cord (like the gray on the far right). That way when you insert it into your garment the basting stitches will be hidden in the seam. When you do insert it, use an invisible zipper foot to get nice and close to the cord for a neat finish.
And voilĂ ! Custom piping that is easy and quick to make.
xCherry

Wednesday, 15 September 2010

Sewing tip: zigzag trimming

Instead of clipping the seam allowance of a curve, use pinking shears to trim the seam allowance to about 3-4mm before bagging out(turning). You end up with less fabric inside and a smoother curve.

xCherry

www.FuriousKingston.com.au

Monday, 6 September 2010

Pro tip: keep snips handy


Pro tip: keep snips handy, originally uploaded by cherry_rockette.
Tie your snips onto your machine with a length of elastic. That way they don't go missing, and they're always to hand when you need them.
I have several pairs, one for each machine and one on the ironing board to trim threads when pressing.
You can do the same with overlockers and their long tweezers.

xCherry

www.furiouskingston.com.au

Wicked welt


Wicked welt, originally uploaded by cherry_rockette.
I am vastly improved on my welt pocket making. Mad skillz my dears.
I just loathe doing 'practice' ones though, I feel like if I'm going to all the effort of sewing something, then I should get something out of it.

xCherry

www.furiouskingston.com.au

Sunday, 5 September 2010

Button tip


Button tip, originally uploaded by cherry_rockette.
Store your buttons on safety pins to keep all of one kind together. Makes it easy to handle them too.

xCherry

www.furiouskingston.com.au

LinkWithin

Related Posts with Thumbnails